

Notes on Making Photo Thumbnails Using ImageMagick (12/2006)
(Click on any of the thumbnails below to view the full-sized photo.)
I've been using Microsoft Front Page to create thumbnails for web pages. I am curious, however, if there are other ways not involving fairly expensive software to achieve the same effect.
A webpage I found (link, .PDF snapshot just in case the page is removed) gave great tips and examples on how to use ImageMagick to create photo thumbnails. I thought I would try some of these examples and see how the results compare. (ImageMagick is free open-source software.)
I don't claim that any of the ImageMagick effects or commands below are things I thought up. The commands were all borrowed from the web page cited above, and this web page is just my experimentation to see how well the effects work with my photos.
Determining Image Dimensions
To lay out web pages and allow the browser to reserve the right amount of space in advance of loading the file, one must know the pixel dimensions of the image file (usually .JPG). I'm looking for a manual way to determine this information so that it can be included in the img HTML tag.
Need help on this. Every command combination I've tried hasn't worked.
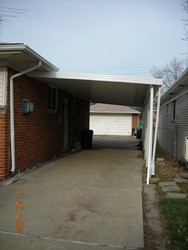
Full-Sized Images Used for Experimentation
The images used were huge. They are:
Making Plain Vanilla Thumbnails
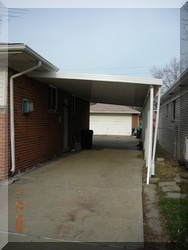
The most generally useful kind of thumbnail image is where the length, in pixels, of the longest edge is limited. It has been my experience that large groups of these images (when landscape and portrait orientations are mixed) look good on a web page.
Let's try it with the longest edge at 250 pixels ...
Issuing the commands:
[dashley@pamc pvthumb]$ convert test_pic_a.jpg -thumbnail '250x250>' test_pic_a_250.jpg
[dashley@pamc pvthumb]$ convert test_pic_b.jpg -thumbnail '250x250>' test_pic_b_250.jpg
Yielded:

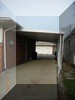
Let's try it with the longest edge at 100 pixels ...
Issuing the commands:
[dashley@pamc pvthumb]$ convert test_pic_a.jpg -thumbnail '100x100>' test_pic_a_100.jpg
[dashley@pamc pvthumb]$ convert test_pic_b.jpg -thumbnail '100x100>' test_pic_b_100.jpg
Yielded:


Summary from my experimentation: the ImageMagick thumbnailing (with no extra frills) seems to work well. The longest dimension in the original image seems to map to the desired maximum size in the thumbnail as expected.
Thumbnails with Beveled Edges
Using the same two test images, reduced in size to have the longest edge at 250 and 100 pixels, and experimenting with the characteristics of the beveled edge yielded the following results.
[dashley@pamc beveledthumb]$ convert test_pic_a_250.jpg -raise 4x4 test_pic_a_250_raise_4x4.jpg
[dashley@pamc beveledthumb]$ convert test_pic_b_250.jpg -raise 4x4 test_pic_b_250_raise_4x4.jpg


[dashley@pamc beveledthumb]$ convert test_pic_a_250.jpg -raise 8x8 test_pic_a_250_raise_8x8.jpg
[dashley@pamc beveledthumb]$ convert test_pic_b_250.jpg -raise 8x8 test_pic_b_250_raise_8x8.jpg

[dashley@pamc beveledthumb]$ convert test_pic_a_250.jpg -raise 16x16 test_pic_a_250_raise_16x16.jpg
[dashley@pamc beveledthumb]$ convert test_pic_b_250.jpg -raise 16x16 test_pic_b_250_raise_16x16.jpg


[dashley@pamc beveledthumb]$ convert test_pic_a_100.jpg -raise 4x4 test_pic_a_100_raise_4x4.jpg
[dashley@pamc beveledthumb]$ convert test_pic_b_100.jpg -raise 4x4 test_pic_b_100_raise_4x4.jpg


[dashley@pamc beveledthumb]$ convert test_pic_a_100.jpg -raise 8x8 test_pic_a_100_raise_8x8.jpg
[dashley@pamc beveledthumb]$ convert test_pic_b_100.jpg -raise 8x8 test_pic_b_100_raise_8x8.jpg


[dashley@pamc beveledthumb]$ convert test_pic_a_100.jpg -raise 16x16 test_pic_a_100_raise_16x16.jpg
[dashley@pamc beveledthumb]$ convert test_pic_b_100.jpg -raise 16x16 test_pic_b_100_raise_16x16.jpg

Summary from my experimentation: the ImageMagick thumbnailing with beveled edges seems to compare favorably with Front Page. There is no apparent difference in quality.
Thumbnails with Sunken Edges
Front Page does not as best I know have the option of beveling edges so as to give the impression that the image is sunken rather than raised. The experimental images below illustrate this effect. (Note in the invocations of ImageMagick below that +raise rather than -raise is used.)
[dashley@pamc beveledthumb]$ convert test_pic_a_250.jpg +raise 4x4 test_pic_a_250_sink_4x4.jpg
[dashley@pamc beveledthumb]$ convert test_pic_b_250.jpg +raise 4x4 test_pic_b_250_sink_4x4.jpg


[dashley@pamc beveledthumb]$ convert test_pic_a_250.jpg +raise 8x8 test_pic_a_250_sink_8x8.jpg
[dashley@pamc beveledthumb]$ convert test_pic_b_250.jpg +raise 8x8 test_pic_b_250_sink_8x8.jpg


[dashley@pamc beveledthumb]$ convert test_pic_a_250.jpg +raise 16x16 test_pic_a_250_sink_16x16.jpg
[dashley@pamc beveledthumb]$ convert test_pic_b_250.jpg +raise 16x16 test_pic_b_250_sink_16x16.jpg


[dashley@pamc beveledthumb]$ convert test_pic_a_100.jpg +raise 4x4 test_pic_a_100_sink_4x4.jpg
[dashley@pamc beveledthumb]$ convert test_pic_b_100.jpg +raise 4x4 test_pic_b_100_sink_4x4.jpg


[dashley@pamc beveledthumb]$ convert test_pic_a_100.jpg +raise 8x8 test_pic_a_100_sink_8x8.jpg
[dashley@pamc beveledthumb]$ convert test_pic_b_100.jpg +raise 8x8 test_pic_b_100_sink_8x8.jpg


[dashley@pamc beveledthumb]$ convert test_pic_a_100.jpg +raise 16x16 test_pic_a_100_raise_16x16.jpg
[dashley@pamc beveledthumb]$ convert test_pic_b_100.jpg +raise 16x16 test_pic_b_100_raise_16x16.jpg


Summary from my experimentation: this effect is interesting, but I don't see the advantage or the fundamental difference between this effect and the raised effect.
3-D Frames
Front Page does not as best I know have this option. Let's start off by making some thumbnails that are slightly larger than the small ones above ...
[dashley@pamc frame3d]$ convert test_pic_a.jpg -thumbnail '125x125>' test_pic_a_125.jpg
[dashley@pamc frame3d]$ convert test_pic_b.jpg -thumbnail '125x125>' test_pic_b_125.jpg


And now the modifications ...
[dashley@pamc frame3d]$ convert test_pic_a.jpg -mattecolor peru -frame 9x9+3+3 test_pic_a_9_9_3_3.jpg
[dashley@pamc frame3d]$ convert test_pic_b.jpg -mattecolor peru -frame 9x9+3+3 test_pic_b_9_9_3_3.jpg


[dashley@pamc frame3d]$ convert test_pic_a.jpg -mattecolor peru -frame 18x18+3+3 test_pic_a_18_18_3_3.jpg
[dashley@pamc frame3d]$ convert test_pic_b.jpg -mattecolor peru -frame 18x18+3+3 test_pic_b_18_18_3_3.jpg


[dashley@pamc frame3d]$ convert test_pic_a_125.jpg -mattecolor turquoise -frame 9x9+1+1 test_pic_a_125_9_9_1_1.jpg
[dashley@pamc frame3d]$ convert test_pic_b_125.jpg -mattecolor turquoise -frame 9x9+1+1 test_pic_b_125_9_9_1_1.jpg


Summary from my experimentation: these effects are visually impressive. This makes ImageMagick a potentially superior alternative to Front Page for thumbnails.
Automating the Process
When I unload photos from my digital camera, I typically use Front Page to create thumbnails and save them as part of a new web page. The process is very labor-intensive and involves inserting each picture manually then selecting it and generating a thumbnail. The process becomes [quadratically] more tedious with large sets of files, because selecting a file that is near the end of a large requires scrolling within the Windows dialog box. I'm looking for an automated way to perform the following operations:
Local time on the server (at the time this page was served) is 11:23:42 pm (America/Detroit) on July 26, 2024. This page required approximately 0.00s (0.00s system, 0.00s user) of CPU time on the server to generate. This page is maintained by David T. Ashley.